Raj from Embedded Lab shows in his latest tutorial guide how to implement adaptive brightness control to seven segment LED displays for optimum readability in all illumination conditions. The technique has been demonstrated by constructing a temperature and humidity meter that adapts the brightness of the seven segment LED displays to the surrounding lighting conditions.The project uses a general purpose LDR to sense the surrounding illumination and MAX7219 to drive the LED display.
subwoffer wiring diagram
Tuesday, February 4, 2014
Auto Brightness Adjustment to Seven Segment LED Displays
Labels:
adjustment,
auto,
brightness,
displays,
led,
segment,
seven,
to
Friday, January 10, 2014
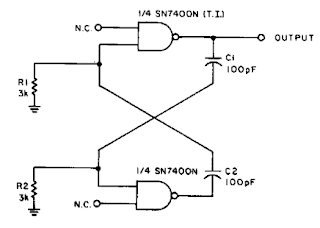
2MHz Square Wave generator Circuit Diagram
With the values shown the circuit generates a 2-MHz symmetrical square wave. Changing capacitors Cl and C2 to 0.01 µ¥ results in a frequency of 500 Hz. For the particular integrated circuits and power supply voltages (5.0 V), the reliable operating range of Rl = R2 is 2 k ohm to 4 k ohm.
2MHz Square Wave generator Circuit Diagram
15 step digital power supply
Here is a simple circuit to obtain variable DC voltage from 1.25V to 15.19V in reasonably small steps as shown in the table.
The input voltage may lie anywhere between 20V and 35V. The first section of the circuit comprises a digital up-down counter built around IC1— a quad 2-input NAND schmitt trigger (4093), followed by IC2— a binary up-down counter (4029). Two gates of IC 4093 are used to generate up-down logic using push buttons S1 and S2, respectively, while the other two gates form an oscillator to provide clock pulses to IC2 (4029).
The frequency of oscillations can be varied by changing the value of capacitor C1 or preset VR1. IC2 receives clock pulses from the oscillator and produces a sequential binary output. As long as its pin 5 is low, the counter continues to count at the rising edge of each clock pulse, but stops counting as soon as its pin 5 is brought to logic 1. Logic 1 at pin 10 makes the counter to count upwards, while logic 0 makes it count downwards. Therefore the counter counts up by closing switch S1 and counts down by closing switch S2.
The output of counter IC2 is used to realise a digitally variable resistor. This section consists of four N/O reed relays that need just about 5mA current for their operation. ( The original circuit containing quad bilateral switch IC 4066 has been replaced by reed relays operated by transistorised switches because of unreliable operation of the former.) The switching action is performed using BC548 transistors. External resistors are connected in parallel with the reed relay contacts. If particular relay contacts are opened by the control input at the base of a transistor, the corresponding resistor across the relay contacts gets connected to the circuit.
The table shows the theoretical output for various digital input combinations.
The measured output is nearly equal to the theoretically calculated output across regulator IC3 (LM317). The output voltage is governed by the following relationship as long as the input-to-output differential is greater than or equal to 2.5V: Vout = 1.25(1+R2/R1) Where, R1 = R15 = 270 ohms (fixed) and R2 = R11 + R12 + R13 + R14 = 220 + 470 + 820 +1500 ohms = 3,010 ohms (with all relays energised) One can use either the binary weighted LED display as indicated by LED1 through LED4 in the circuit or a 74LS154 IC in conjunction with LED5 through LED20 to indicate one of the 16 selected voltage steps of Table I. The input for IC4 is to be tapped from points marked ‘A’ through ‘D’ in the figure. This arrangement can be used to replace the LED arrangement at points A, B, C, and D. This 74LS154 IC is a decoder/demultiplexer that senses the output of IC2 and accordingly activates only one of its 16 outputs in accordance with the count value. LEDs at the output of this IC can be arranged in a circular way along side the corresponding voltages.
When the power is switched on, IC2 resets itself, and hence the output at pins 6, 11, 14, and 12 is equivalent to binary zero, i.e. ‘0000’. The corresponding DC output of the circuit is minimum (1.25V). As count-up switch S1 is pressed, the binary count of IC2 increases and the output starts increasing too. At the highest count output of 1111, the output voltage is 15.19V (assuming the in-circuit resistance of preset VR2 as zero). Preset VR2 can be used for trimming the output voltage as desired. To decrease the output voltage within the range of 1.25V to 15.2V, count-down switch S2 is to be depressed.
Notes.
1. When relay contacts across a particular resistor are opened, the corresponding LED glows.
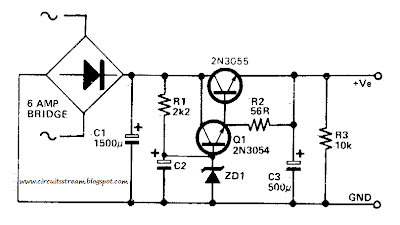
Build a Low Ripple Power Supply Circuit Diagram
How to build a low ripple power supply circuit diagram. This simple low ripple power supply circuit diagram may be used where a high current is required with a low ripple voltage (such as in a high powered class AB amplifier when high quality reproduction is necessary) , Ql, Q2, and R2 may be regarded as a power darlington transistor.
ZDl and Rl provide a reference voltage at the base of Ql. ZDl should be chosen thus: ZDl = Von-1. C2 can be chosen for the degree of smoothness as its value is effectively multiplied by the combined gains of Q1/Q2, if 100 µF is chosen for C2, assuming minimum hfe for Ql and Q2, C = 100 x 15(Q1) x 25(Q2) = 37,000 µf.
Low Ripple Power Supply Circuit Diagram
Subwoofer Lowpass Filter uA741 Single Op Amp
This is the simplest Sub woofer Low Pass filter Circuit using uA741 single op amp ic. The circuit is very low cost with respect to their work. The cut off frequency of this circuit is 25Hz to 80Hz maximum. Using this circuit , you can easily design a 2.1 Sub-woofer Speaker System at your own Home. The circuit contains very few components. In Pakistan, the cost of this circuit with PCB is Rs:45 The same circuit is working in my own hand made sub-woofer system. So Try this [Link]
Parts List:
R1,R3,R4 = 10K 1/4W
R2=100K 1/4W
CY1,CY2 = 0.22uF Polyester
C1,C2 = 10uF/25V Electrolytic
IC1 = uA741A Single Op-Amp Ic + 8 Pin Ic Socket
3 Pin Male & Female Connector x 2
2 Pin Male & Female Connector x 1
PCB as in required size 4.5 cm x 3.4 cm
Read More..
Parts List:
R1,R3,R4 = 10K 1/4W
R2=100K 1/4W
CY1,CY2 = 0.22uF Polyester
C1,C2 = 10uF/25V Electrolytic
IC1 = uA741A Single Op-Amp Ic + 8 Pin Ic Socket
3 Pin Male & Female Connector x 2
2 Pin Male & Female Connector x 1
PCB as in required size 4.5 cm x 3.4 cm
Thursday, January 9, 2014
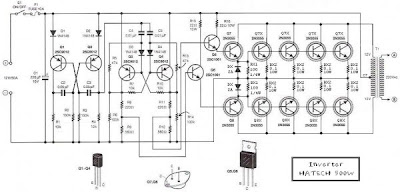
Simple 500W Inverter 12 Volt to 220 Volt Circuit Diagram
This is the Simple 500W Inverter 12 Volt to 220 Volt Circuit Diagram about the the inverter, because like working outdoors, or to backup storage to use when necessary. Most of this is circuit low power, which is not suitable for practical applications. My friends said that he would be about 500 Watt. It is a good size. Use with television receivers and light bulbs as well. When looking for circuit. I get headaches.
500W Inverter 12 Volt to 220 Volt Circuit Diagram
If you are a beginner or I can not buy expensive good quality circuits. Requires only one transistor. Or if you have free time. I want to build old circuit is alive again. This circuit will accommodate all your needs. It is a simple circuit. The same principle, I take battery voltage 12V to produce a oscillator about 100 Hz and pass to a two frequency divider circuit is only 50HZ. and drive a 10 ampere transformer with 10 x 2N3055 transistor in parallel.
By a single transistor has 2A, when I use 10 transistors or 5 pairs of drive high current output. The complexity of circuit, but the principle is not it, and it is the number of transistors on a basic, easy to buy. You may be modified 100 watt power inverter To the size of transistors and transformers as well.
Note:
If you think that This circuit is not good enough. For your work. It is hard to find equipment. You do not have it now. These circuits may be viewed below. It may be appropriate for you.Source: leksound project
Friday, December 27, 2013
Build a Isolated 15V To 2500V Power Supply Circuit Diagram
Build a Isolated 15V To 2500V Power Supply Circuit Diagram. A dc-dc converter using a 74HC04 drives Tl. Tl is a ferrite-core transformer using a Fair-Rite, Inc. P/N 5975000201 (uo + 5000) and has a 7-turn primary and a 25-turn secondary. Kynar, #30 wirewrap wire is used. With Tl, the circuit isolation is good to 2500 V.
Isolated 15V To 2500V Power Supply Circuit Diagram
Subscribe to:
Posts (Atom)